How to Align B-Roll and Images to a Voiceover Automatically
You've recorded the voiceover. You've collected sixty clips and stills. Now comes the least creative hour (or day) of the whole project: lining each visual up with the exact sentence it illustrates, one drag and one trim at a time.
This post shows how to hand that job to a deterministic process. We'll cover how editors do it by hand today, what "automatic" really means (it means two very different things), and a step-by-step method that turns a voiceover and a numbered folder of your own media into a timed Final Cut Pro timeline.
Quick answer: transcribe the voiceover into sentence-level caption blocks with timestamps, name your assets with zero-padded numbers in the order they should appear, pair asset N with caption N, export an FCPXML sequence, and import it with File → Import → XML. Details below.
Scope note: the automated method here needs Final Cut Pro 10.5+ on an Apple Silicon Mac (macOS 12 or later). If you edit in Premiere or DaVinci only, the principles still apply, but the tool we describe exports Final Cut Pro XML.
The problem, in one number
If your narration has N sentences and each gets its own visual, you have N placements and N trims to perform. For a 10-minute video at roughly 160 spoken words per minute, that's about 1,600 words, which is easily 80 to 120 sentences. At two operations each, you're past 200 precise edits before any creative work begins.
Editors feel this. A well-known thread on r/finalcutpro, "Best way to add B-Roll on top of VO?", is full of workable but manual answers. Video essayists in r/PartneredYoutube describe 2 to 3 weeks of evenings for a 20 to 25 minute piece. Industry estimates run to 2 to 3 days to edit a typical 10-minute video and 15 to 30 hours for heavily edited work. Not all of that is alignment, but alignment is the part that is purely mechanical.
How Final Cut Pro editors do it today
Manual drag-and-trim
The baseline. Voiceover on the primary storyline, then for each sentence: find its start, drag the clip to that point, trim the tail to where the next sentence begins. It's precise and fully under your control, and it scales linearly with the number of sentences.
Connected clips and a secondary timeline
The most common refinement, and the one most upvoted answers recommend: keep the VO on the primary storyline and attach each B-roll clip as a connected clip above it. Connected clips travel with the audio if you ripple-delete or move sections, which is a real advantage when you restructure the script. Some editors build the B-roll sequence in a separate project, then nest it above the VO.
Markers
Another trick: play the VO and tap M at each sentence boundary to drop markers, then snap clips to the markers. It's more accurate than eyeballing the waveform, but you're still the one finding every sentence boundary.
All three work. None of them scales. Each is a 1:1 job done by hand, and Final Cut Pro has no built-in command that places clips against a voiceover sentence by sentence (we cover what FCP does and doesn't automate in Does Final Cut Pro Auto-Sync B-Roll to Audio?).
What "automatic" actually means
Search for "automatic B-roll" and you'll find two quite different things under the same label.
| Auto-generate footage | Auto-place your footage | |
|---|---|---|
| What it does | Analyzes your transcript, then finds or generates visuals for you | Takes the visuals you already have and aligns them to the narration |
| Examples | Kapwing's AI B-Roll Generator ("analyzes your video transcript to identify key themes… then automatically matches them with high-quality B-roll") · Pictory Auto-Sync (aligns an uploaded voiceover to video scenes) | MatchCut FCP (this method) |
| Whose media | The tool's stock or generated media (mostly) | Yours |
| Where it runs | Cloud, in the browser | On your Mac |
| Output | A finished video in the vendor's editor | A native Final Cut Pro timeline |
| Best for | Fast generic explainers where any relevant stock will do | Essays and documentaries where this exact shot has to hit on this exact line |
Neither is better in the abstract. If you need a quick, template-driven video and don't have footage, a generator is the sensible tool. If you've already picked every shot (or you're a documentarian, essayist or archive-driven storyteller) you don't need a tool to choose visuals. You need one to place them, because the creative decision has already been made.
That second category is what we'll build now.
The ordered-folder method, step by step
The whole method rests on one idea: if the order of your files is the order of your narration, alignment becomes data, not labor.
1. Record or finalize the voiceover
Record the narration as a single audio file (WAV, FLAC, MP3 and OGG load directly; M4A, AAC and others go through macOS). Leave a short, consistent pause between sentences. Cleaner pauses mean cleaner sentence boundaries when we transcribe.
Edit out flubs before you transcribe. Everything downstream is timed against this file, so changing it later means redoing the alignment.
2. Transcribe to SRT
An SRT file is the simplest timed-text format there is. Per the Library of Congress format description, it's a sequence of numbered blocks, each with a time range in HH:MM:SS,mmm --> HH:MM:SS,mmm form, the text, and a blank line between blocks:
1
00:00:00,000 --> 00:00:03,400
In 2019, a single spreadsheet error cost a city millions.

2
00:00:03,400 --> 00:00:05,900
Nobody noticed for three years.
Each block is a ready-made "slot" with a start and an end. If you transcribe sentence by sentence, each slot is exactly one thing you want to illustrate.
You can generate the SRT any way you like. MatchCut FCP does it in-app: drop your audio on the Step 1 drop zone and select Generate Subtitles. It uses whisper.cpp to transcribe on your Mac, so your audio is never uploaded, splits the transcript into sentence blocks, and saves an .srt to ~/Library/Application Support/MatchCut FCP/SRTs/. (The speech model is a one-time download; the default base model is roughly 145 MB.) 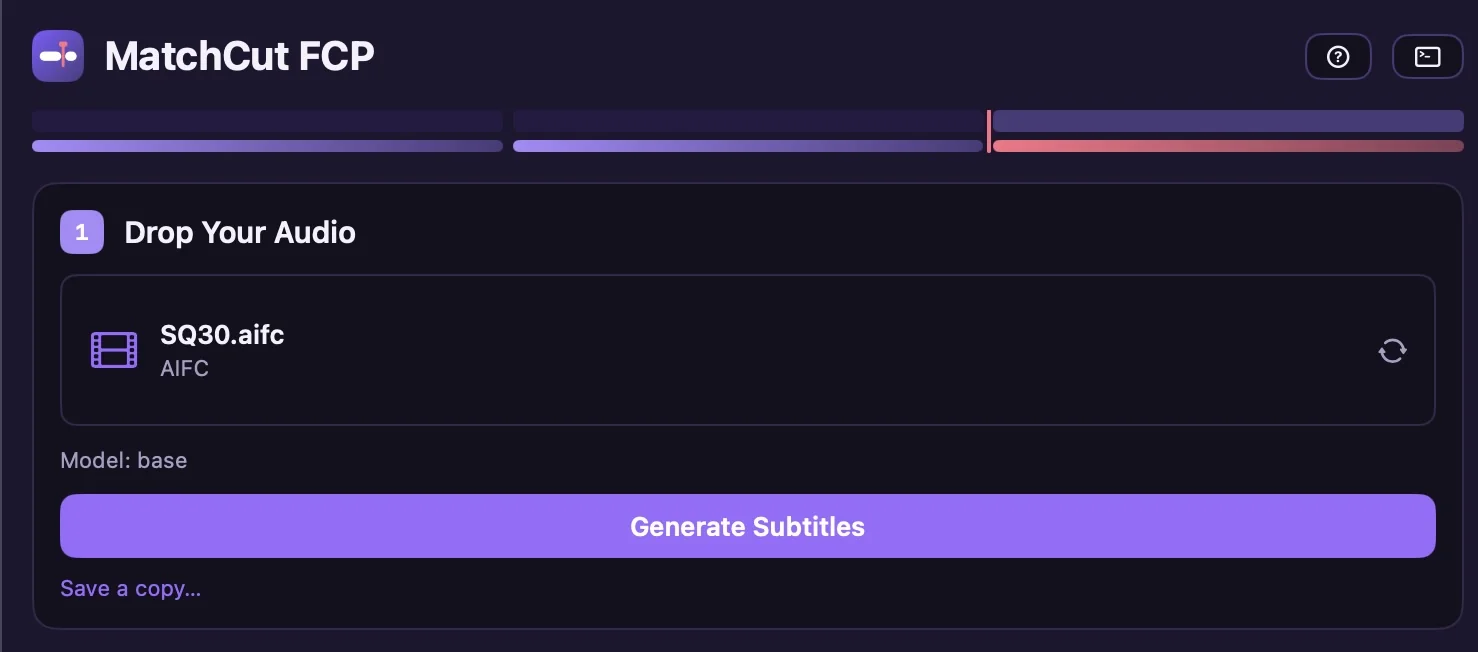
If you already have an SRT, from FCP's own caption generation or another tool, pick Already have subtitles? Use an existing .srt… instead.
3. Number your clips and stills
This is the step that decides whether everything works. Rename every asset with a zero-padded sequence number in the order it should appear:
001_intro_wide.mp4
002_spreadsheet_closeup.png
003_calendar_flip.mov
004_council_archive.mp4
…
060_outro.mp4
The rules that prevent most failures:
- Zero-pad.
001to060, never1to60. Without padding, many file lists sort10before2. MatchCut sorts in natural order, soclip_10followsclip_9, but zero-padding keeps you safe in every other tool too. - No gaps. Pairing is positional: asset 1 to the first block, asset 2 to the second, and so on. If you skip 017, everything after it slides out of place.
- One sequence for everything. Clips and stills share one number line. A still between two clips simply gets the number in between.
- Supported formats. Video:
mp4,mov,m4v,mkv,avi,webm,mpg,mpeg. Stills:png,jpg,jpeg,gif,heic,webp. - Keep the file name meaningful after the number.
017_tax_form.pngwill save you when you're debugging at midnight.
4. Align 1:1
In MatchCut FCP, Step 2 is Load Your Clips. Drag the folder (not individual files) onto the drop zone. The app lists the assets in order and shows the count against the number of caption blocks.
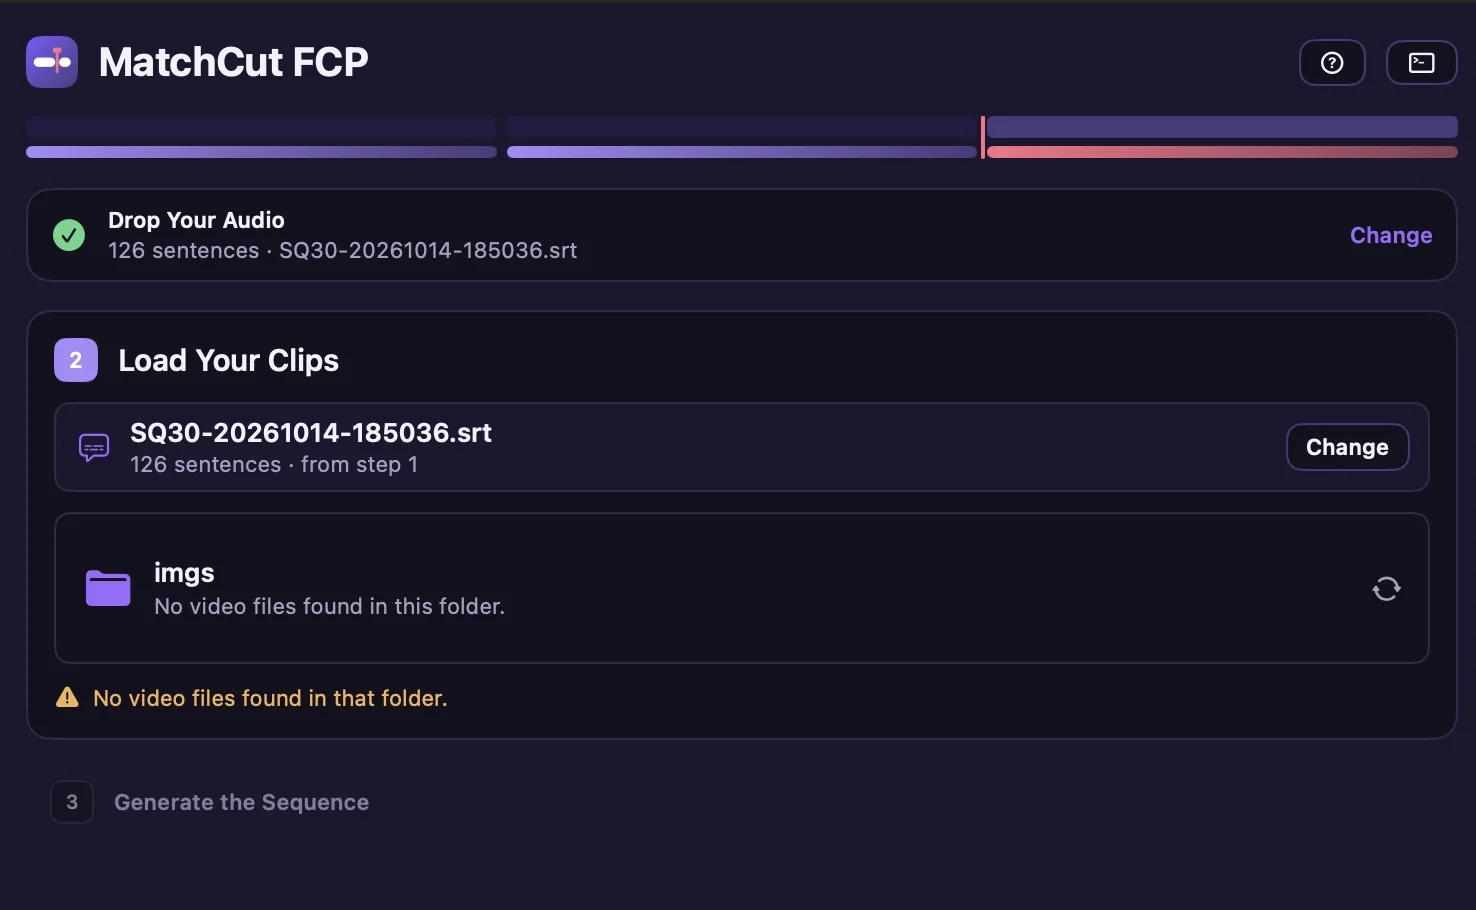
Each asset is placed at the start time of its caption block and shown for the duration between that caption's start and the next caption's start:
Duration = start of next caption − start of this caption
That formula is why the timeline has no gaps between shots: every shot holds until the next one begins.
(Our earlier demo video, published when the app was called Frame Hero, shows this at work: "Turn 60 Subtitle Blocks into 60 Timed Video Clips in 2 Seconds in Final Cut." The 2 seconds is the alignment and export step on the demo machine, not the whole project.)
5. Export FCPXML
Step 3 is Generate the Sequence. Select Export FCP XML and choose where to save the .fcpxml. The app writes a valid Final Cut Pro XML version 1.9 timeline.
6. Import into Final Cut Pro
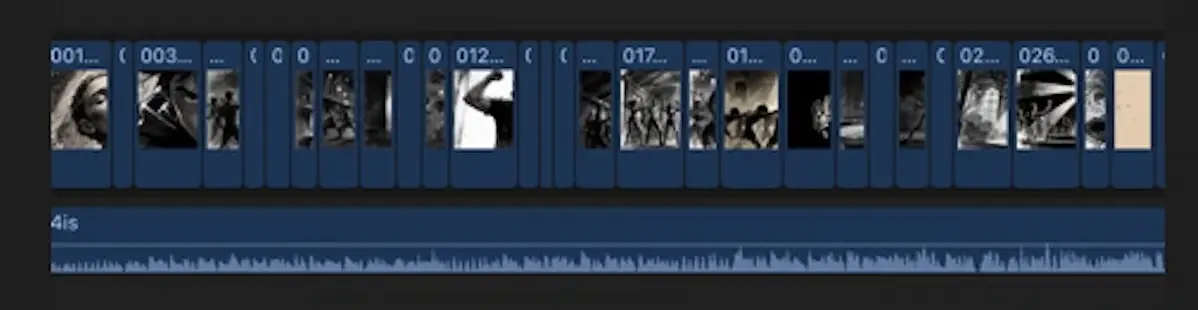
In FCP choose File → Import → XML… and select the file. As Apple's documentation explains, when you import an XML file, Final Cut Pro generates clips, events, projects and a library depending on its contents. You'll land on a new event and a timeline with each asset aligned to your voiceover.
Scrub the timeline against the audio to check alignment, then do the editing: transitions, motion, graphics, music, color, sound. That's the part that needed you all along.
If you want the click-by-click reference for the app, it's in Generate a rough cut from a folder of clips and your voiceover.
Naming rules that prevent 90% of failures
If the result looks wrong, it's almost always one of these:
| Symptom | Likely cause | Fix |
|---|---|---|
| Every shot after one point is shifted | A skipped or duplicated number | Renumber the folder with no gaps |
| Shot 10 appears right after shot 1 | Missing zero-padding in another tool | Use 001 style padding |
| Export blocked with a count warning | Asset count ≠ caption count | See the next section |
| A visual shows for two sentences' worth of time | One caption block contains two sentences | Split the sentence in the SRT, or merge/split assets to match |
| A shot flashes for under a second | A very short caption block (a fragment like "Right.") | Merge it into the neighbouring block in the SRT |
Where it breaks and how to fix it
Counts don't match. Pairing is strict: caption blocks must equal assets. If they differ, MatchCut FCP blocks the export and shows a warning before writing a file. A blocked mismatch doesn't use up a free export. You can choose to override and export only the matched items (the smaller of the two counts), but the usual fix is better:
- Open the generated
.srtand count blocks against assets. - If the transcription split a sentence badly, edit the SRT, then reload it with Use an existing .srt…
- If you have extra or missing visuals, add or remove assets until the counts agree.
Treat the SRT as the source of truth. The number of caption blocks controls the timeline, so it's worth five minutes of checking before you export.
Transcription errors. Whisper-class models are very good, but proper nouns, numbers and jargon can slip. For alignment purposes, wrong words matter less than wrong boundaries: you're only using timing. Still, fix the text if you plan to use the SRT as captions.
Mis-split sentences. Long, comma-heavy sentences or heavy ums can produce odd breaks. Fix by editing the SRT or by re-recording with clearer pauses.
You can repeat any step: select a completed step's row to reopen it and change its input.
When not to use it
Automation fits the body of a narration-led video. It's the wrong tool for:
- Hero moments. The three shots your whole video hinges on deserve hand-timing, a deliberate hold or a custom move. Auto-place the other fifty-seven, then finesse those three.
- Visuals that span several sentences (a long hold, a slow push-in). Either let one asset span a single long caption, or place that shot manually on top afterward.
- Footage that needs in-clip sync, such as an interview where picture must match the speaker's mouth. That's a multicam/sync job, not a narration-alignment job.
- Projects with no ordered shot list. If you don't yet know which visual goes with which line, solve that first; an audio-visual script is the cure.
Manual vs automatic: a fair comparison
| Manual (connected clips) | Auto-generate (cloud B-roll tools) | Ordered-folder alignment (MatchCut FCP) | |
|---|---|---|---|
| Control per shot | Total | Low to medium | Total over which shot; timing follows the narration |
| Setup effort | None | Upload script/VO | Number your files |
| Speed on 60+ shots | Slow (hours to days) | Fast | Fast (export in seconds once files are numbered) |
| Uses your own media | Yes | Mostly no | Yes |
| Privacy | Local | Uploads to cloud | Transcription and alignment on-device |
| Where you finish | Final Cut Pro | The vendor's editor | Final Cut Pro (native FCPXML) |
| Cost model | Free (your time) | Subscription | $19 early access; subtitles and your first two exports are free |
The honest summary: if you have five clips, do it by hand. If you have sixty, and you've already chosen them, let the folder do the placing.
FAQ
Does MatchCut FCP upload my audio? No. Transcription runs on your Mac with whisper.cpp. (The license check does contact a server up to about once a day, so we won't claim it's "100% offline.")
Does it work without Final Cut Pro? No. It exports a Final Cut Pro XML timeline, so you need FCP to open the result. It requires an Apple Silicon Mac on macOS 12 or later and Final Cut Pro 10.5 or later.
Does it pick B-roll for me? No. You choose and number the media; it aligns it to the narration. It doesn't generate footage or images or write your script.
What if I have fewer clips than sentences? Add visuals (re-using a clip is fine, just give each use its own number), or merge short sentences in the SRT, or use the override to export the matched portion.
Can I use stills and clips together? Yes, on one number line.
Is it free? Subtitles are always free and your first two successful FCPXML exports are free. Full access is a $19 early-access purchase.
Try it on your next project
Number a folder, drop in your voiceover, and see your next rough cut build itself. Start with the product tour or the download, or get early access for $19.
Related reading: the full video essay workflow in Final Cut Pro, and how MatchCut FCP compares with Descript, Cutsio and Builder NLE.
Sources
Product claims: help center, FAQ, license help. External, accessed 2026-10-16:
- Apple — Use XML to transfer projects
- Library of Congress — SubRip (SRT) format description
- ggml-org — whisper.cpp
- Kapwing — AI B-Roll Generator · Pictory — Upload Voiceover & Auto-Sync
- Reddit — r/finalcutpro: Best way to add B-Roll on top of VO? · r/PartneredYoutube: video essayists' workflow
- Leadde — How to Make a Video Essay · Tom Kim — LinkedIn · Gling — editing time